============================================
(No extra cost for you to buy these product at Amazon; we receive small commission);
============================================
Five Size: 4, 5.5, 7.5, 10, 13 for use with Ropes 1/8" Hollow Braid to 1 1/8" Double Braid Or 3 Strand Rope
============================================
============================================
Manual Hand Impact Driver Set
TEKTON 2905 3/8-Inch Drive Manual Hand Impact Driver Set, 7-Piece
============================================
Submersible Pump
Tsurumi HS2.4S; semi-Vortex Submersible Trash Pump w/Agitator, 1/2hp, 115V, 2" Discharge
============================================
Discharge Hose Assembly for submersible pump (above)
Abbott Rubber 1147-2000-50 PVC Discharge Hose Assembly, Blue, 2" Male X Female NPSM, 65 psi Max Pressure, 50' Length, 2" ID
============================================
VALVE & COUPLING for submersible pump (above)
DIXON VALVE & COUPLING Global Cam & Groove Type A
============================================
============================================
============================================
============================================
============================================
============================================
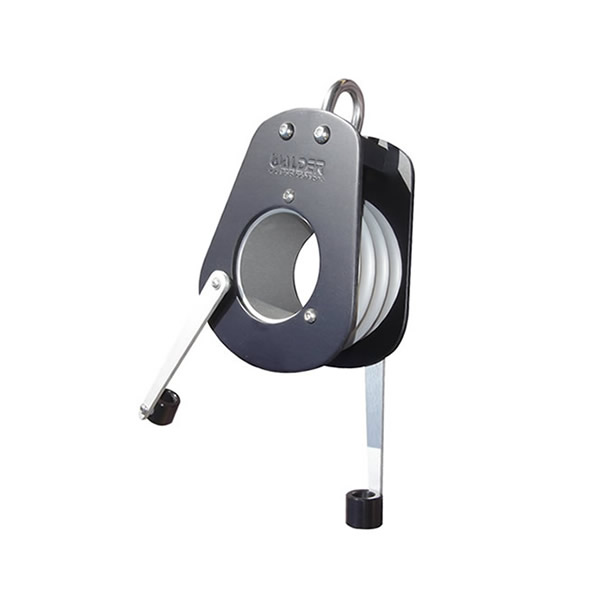
Boombrake Walder® 403


Depth, Speed, Temperature
- Use silicone spray on an O-ring; Never use Vaseline or lip balm on seals......
- Use magnet (ring) around the metal oil filter on the engine to keep metal shavings on the filter instead of traveling through the engine as the oil travels around the engine cooling it.
- PbBlaster (carefull it can dissolve plastic...)
- Kroil- penetrating oilboeshield T-9 on metal to prevent corrosion -apply liberally
- Liquid wrench
- Lanocote - marine grade rust and corrosion protection and anti seas in fittings
- Tef-gel - corrosion prevention and anti sees.
- Seafoam Deep creep
- One to one Acetone and Automatic Transmission Fluid
- tef-gel
- T-9 rust and corrosion protection
- CorrosionX - for when u see corrosion and all electrical connections. Paint parts so they don’t rust.
- “Never Dull” - shine chrome surfaces
- prism - metal polish and fiberglass deoxidizer
- Duralac - anti corrosive joint compound that inhibits electrolytic corrosion between dissimilar metals
- Black plastic wire ties work best
- Lighter fluid - used as a cleaning fluid for small items such as very small bearings.
- White Marine Tex - super epoxy for all kinds of repairs
- KOSSAN GLUE is specially formulated for specialised use in the MARINE and CONSTRUCTION industries. It has excellent adhesion and strength. Use to bond WOOD, CONCRETE, CERAMICS, PLASTICS and OTHER SURFACES
- Silicone grease to oil rubber-o-rings
- Sewing machine oil - use to oil for very small gears and bearings
The Overview of the Marine Fuel System
- The Total Fuel Flow of your engine-not just the max rated fuel burn. It’s real typical to have a diesel engine rated at 300 HP (16 GPH max fuel consumption at rated WOT) but have a fuel flow of 60 GPH-1 gallon per minute ! Your entire fuel delivery and filtration system needs to be sized for the max fuel flow and not just maximum fuel consumption.
- The Tankage or Holding Methods your vessel-older fuel tanks will typically have something in the fuel tank that that you do not want your engine to burn or get anywhere near the “on-engine” or last chance filter that is part of the engine fuel system. Whether it is be some type of growth (algae), accumulated “mud” (diesel fines, sludge build-up, etc), rust flakes (from older steel/iron tanks), water, internal tank coatings that are deteriorating, or ???, there is always something in there that should not make it past your OFF-ENGINE / PRIMARY fuel filter system. Remember this for later.
- Your Application and Use – Using your vessel for the weekends and making 150 mile round trips 10-20 times a year is very different than working your vessel 20 days a month 10 months out of the year. Big fuel burners will typically need larger capacity fuel filters to keep maintenance intervals to an acceptable level, but anyone will benefit from more filtration capacity as it will eventually pay dividends by not clogging as easily when you (finally) get that lousy tank of fuel.
- The Fuel Injection System Requirements of your engine – Every manufacturer of diesel engines have certain MINIMUM requirements for the quality of the fuel that is fed to the engine. Cleanliness is next to godliness when we talk fuel injection as there is no such thing as “too clean”.. So, after spending 10’s of thousands of $$ on either a new boat or a repower, why would not spending a few $100 more by upgrading the “minimum” of fuel filtration equipment that is typically part of the supplied equipment list in just about every boat I see, not be a wise investment? Adding an additional layer of fuel filtration protection and using the most modern filtration media available will always be the best money spent for long term reliability for any fuel supply system on a diesel engine-and that applies to your truck and RV too. Things have improved much since the days of cellulose or treated cellulose media typical of most replacement fuel filter elements.
Multi-Stage Filtration
So what is “Multi-Stage filtration??
Our second stage of the “Multi-Stage” fuel filter system
Upgrades for new Common Rail Fuel Injection & Problem Fuel Systems
Primary Fuel Water Separator Specifications (minimum):
- 10 micron filter rating
- Separator must have a 36 gram minimum capacity per SAE J1905
- 98.7% efficiency using ISO A2 test dust per SAE J1985 test methods
- Filter must remove 95% (or more) coarse water droplets over the life of the filter, per SAE1488
More reading and thoughts about modern fuel filtration
- Beta Ratio micron rating
- Fuel flow vs. pressure drop rating when clean
- Dirt holding capacity vs fuel flow-pressure drop
- “Free” and “Emulsified” water separation ratings
- Ratings / specifications from SAE, ISO and other world recognized organizations
- Other important parameters concerning collapse and pressure ratings, etc., that were developed in conjunction with a specific requirement from an engine manufacturer
Can you have “Too Much” filtration?
Some RACOR Thoughts
Practical Fuel Filtration to 2 MIC
Vacuum Gages and Fuel System Restriction
Tips for Your Selection of a Fuel Filter System
- It’s always best to either draw your fuel from the bottom of the tank (you want the crap in your filters and not sitting in the bottom waiting to get stirred up in the first bad weather), OR have a drainable fuel tank sump, OR BOTH.
- Be sure the fuel lines, valves and fittings that feed your filters do not restrict the flow or allow air to enter the system. Choosing the next size of filter in capacity ratings will assure you of a longer time between clogging.
- A vacuum gauge installed just before a fuel lift pump will more that pay for itself if installed correctly and its operation is understood by the operator. The use of a vacuum gauge adds “science” as to when to change your filters.Easy View Vacuum Gauges
- An in-line sight glass or clear piece of vinyl hose (temporary) installed in the fuel line is one of the best tools for addressing fuel / air leaks in a fuel system when troubleshooting.
- Always be sure the filters you choose to use are sized in stages with the largest capacity and nominal mic rating closer to the fuel tank. “Multi-Stage”, remember??
- Be sure your “return fuel system” cannot be shut off when switching tanks or at any time during engine operation.
- If the engine fuel system design allows the use of a submerged return line, consider this as a worthwhile addition to the fuel system. But, also read your engine installation requirements as not all systems recommend this, although MOST DO.
- Fuel transfer: With multiple tanks and the need to transfer fuel with an electric pump, putting an old fashion type spring wound timer w/ normally open electrical contacts ( available thru many home improvement stores and industrial supplies) will save you from the many embarrassments that typically occur by pumping fuel into the bilge or overboard due to overfilling. I rarely recommend using return fuel for fuel transfer because of typical flow rates above 60 GPH in many cases, it is easy to “forget” about the valve you messed with a hour ago. We prefer using a 12 VDC electric pump with flows around 30-50 GPH with a fuel filter on the suction side of the pump (FF5013), w/ 60 minute timer. Not only will you not forget, you will be “polishing” your fuel in the best way – with the boat “rocking and rolling”. Need 50 gallons moved from port to starboard?? Just the right twist and your done!!
- If you really want to know what type of ugly stuff is in your fuel tank and how good your filters are really working, cut open your “on-engine” spin-on and take a look. This is the one method that will let an operator really find out what is getting thru to his last chance filter on the engine. Cutting open filter in your Primary system, will tell you what’s really in the fuel tank.
- If you have “Racor Phobia”, but tired of the mess having to take apart your Racor Bowl to clean it out, put a bulk separator spin-on in front of it. You’ll be amazed a year down the road at the difference.Multi-Stage with Racor’s and fuel transfer polishing systemSimple and very effective upgrade for Racor’s – Adding a bulk separator as the primary
- Be sure none of your fuel tank vent lines contain a “low spot” – you want them to drain completely when the boat is static or in motion. If they can run forward and rise at the same time, this is always a better choice for routing. With large wing tanks, it is usually best to vent on the inside top and fwd edge of each tank. This allows the tanks to vent better if the boat starts to heel during filling.
- A properly installed sight gage on your fuel tanks is the best assurance of knowing how much fuel you really have.
- When building / designing a fuel system w/ many pipe thread type fittings, manifolds, etc. consider the use of a 100% solids epoxy for the “pipe dope”. Many installations cannot tolerate even the slightest “sweat” of diesel on a fitting. We started this practice about 15 years ago, and we never get a “call back”… Grey “Marine Tex” and some Simpson (ET-22) products do a great job and will never let you down, besides being easy to use and clean up.
YANMAR 4JH2-(DTE):
http://www.mason44.com/Linked-Files/4JH2E-Service-Manual-Searchable.pdf
Engine Life vs. Engine Loading
Engine loading and understanding how the engine is designed to operate is paramount to long engine life
Forward-looking sonar
Respirator and Dust Mask Safety
Checking Fit
Testing Safety Masks for Fit
- Filter cartridges start to degrade from the moment the seal on the packet is broken. Don’t expect a ‘new’ level of protection from filter that may have been used once but has been on the mask for a few months or more. Check with the manufacturer to get the life of a cartridge once opened.
- Very true. After EVERY use the mask should go in a freezer bag to reduce the amount of solvent the cartridges draw in from the ambient air. When spent the cartridges will either increase resistance to breathing or you will be able to smell the solvent. If the solvent or chemical has poor warning characteristics (no smell) OSHA does not permit using an air purifying respirator.It is a good habit to clean and inspect the mask after every use. It will be more pleasant to wear and will be ready. Don’t share masks.
Spa Extra 079 Antifouling
Use the Magic of a Riding Sail at Anchor
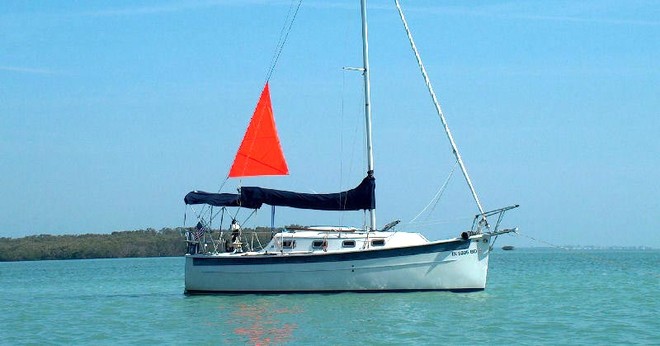
Rest Easy with a Riding Sail
Simple over-the-boom design compares surprisingly well in testing.
What We Tested
Observations
Calculating Force
Sizing a Riding Sail
Steadying in Storm Winds
DIY Conventional Riding Sail
Sailrite Kit (small 90011a)
Banner Bay Marine Fin Delta
Delta Riding Sail
Delta sail (with a SEA Anchor)
Conclusions
Comments (3)
Keto Pizza Pockets
Ingredients
Mozzarella Dough
- 170 g pre shredded/grated cheese mozzarella
- 85 g almond meal/flour
- 2 tbsp cream cheese full fat
- 1 egg medium
- pinch salt to taste
Pizza Pocket Filling Ideas
- pre shredded/grated cheese
- tomato paste
- pepperoni slices
- peppers sliced
- mushrooms sliced
Instructions
- Mix the shredded/grated cheese and almond flour/meal in a microwaveable bowl. Add the cream cheese. Microwave on HIGH for 1 minute.
- Stir then microwave on HIGH for another 30 seconds.
- Add the egg, salt and mix gently.
- Roll the keto cheese dough between 2 pieces of baking parchment/paper. Do not roll as thin as a thin pizza crust. It needs to be a little thicker so it is sturdy and will hold the pizza filings. See photos in this post.
- Remove the top baking paper/parchment. Cut the dough into squares the same size as your toasted sandwich maker.
- Place one square on the bottom of the sandwich maker, add your choice of fillings, place another square of dough on the top, press the lid of the sandwich maker down and cook for 3-5 minutes until golden.
Notes
Turkish Eggplant Casserole with Tomatoes (Imam Bayildi)
Ingredients
- 2 medium eggplant (or 4 small Italian eggplant), about 1 3/4 pound, thinly sliced 1/4 inch thick lengthwise
- Sea salt
- Olive oil
- 1 small yellow onion, diced
- 2 large garlic cloves, minced
- 1/4 teaspoon red chili flakes
- Dash of cinnamon
- One 14.5 ounce can diced tomatoes
- 2 tablespoons finely chopped fresh parsley, divided
Instructions
- Preheat the oven to 350 degrees F.
- Lightly salt the eggplant slices and allow to stand for 20 minutes. Pat the slices dry and set aside.
- Heat a thin layer of olive oil in a large oven proof (preferably cast iron) skillet. Pan fry the eggplant in batches over medium-high heat until golden brown on both sides, about 2 minutes per side. Add more oil as necessary between batches so the eggplant doesn't burn, but try not to have too heavy a hand - the pan just needs to be greased. Remove the eggplant to a plate.
- Add the onion to the skillet and saute over medium heat until soft, 5 minutes. Add the garlic, chili flakes, 1/2 teaspoon sea salt and cinnamon. Cook for one minute more, until fragrant. Carefully pour in the tomatoes and simmer until thickened slightly, 5 minutes. Remove from the heat and stir in half the parsley.
- If using an ovenproof skillet, remove 3/4 of the sauce to a bowl, leaving a thin layer behind. Otherwise, add 1/4 cup of sauce to the bottom of a 8x8 or comparable casserole dish. Arrange one layer of eggplant evenly in the bottom of the skillet or dish. Slather with a layer of sauce, and repeat with the remaining eggplant and sauce - like you would a lasagna.
- Cover with foil and bake in the oven for 45 minutes, until the eggplant is very soft and the sauce has reduced. Allow to sit for 10 minutes before cutting into it. Garnish with the remaining parsley and serve warm or at room temperature.
Recipe Notes
Sugar-Free Gummies & Worms
Ingredients
Ingredients required for each flavour tea you choose to use
- 2-3 fruit tea bags
- 250 ml hot water
- 3 tbsp gelatine powder
- 2 tbsp granulated sweetener, of choice or more, to taste
Instructions
For each fruit tea flavour
- In a heatproof dish or mug, add the fruit tea bags and 250ml (1 cup) hot water. Leave to brew until a very strong flavour develops.
- Remove the fruit tea bags, and whilst still hot, add the gelatine and sweetener. Stir to dissolve.
- Add food colouring (optional). Repeat the recipe for the next flavour fruit tea.
Pouring the moulds
- Gently fill the droppers (as instructed above) and begin to fill the gummy bear and worm moulds.
- Place in the fridge until set. This takes about an hour, but the longer you leave them, the more solid and sturdy they will become.
Tips & Similar Recipes:
- For more tips on how to make the perfect low-carb loaf, have a look at this post(troubleshooting at the end of the post).
- This dough is based on the these Keto Buns(without the garlic powder, onion powder, sesame seeds and cream of tartar)
- Nut-free keto buns - include flaxmeal and coconut flour.
- Psyllium-free buns - include flaxmeal, almond flour and coconut flour.
- Flax-free, multi-purpose bread, includes coconut flour and a nut-free option.
- If you don't want to use coconut flour:Although I haven't tried it, I'd use twice the amount of almond flour or flaxmeal instead of coconut flour (1 cup of almond flour / flaxmeal instead of 1/2 cup coconut flour). Or you can use the same amount but reduce the water by ~ 1/2 cup.
Hands-on
Overall
Nutritional values (per 1 regular baguette)
Total Carbs | 14.1 | grams |
Fiber | 9.6 | grams |
Net Carbs | 4.5 | grams |
Protein | 12.2 | grams |
Fat | 16.4 | grams |
of which Saturated | 2.7 | grams |
Calories | 232 | kcal |
Magnesium | 100 | mg (25%) |
Potassium | 359 | mg (18%) |
Ingredients (makes 8 regular baguettes or 16 mini baguettes)
Dry ingredients:
- 1 1/2 cup almond flour (150 g / 5.3 oz)
- 1/3 cup psyllium husk powder (40 g / 1.4 oz)
- 1/2 cup coconut flour (60 g / 2.1 oz)
- 1/2 packed cup flax meal (75 g / 2.6 oz)
- 1 tsp baking soda
- 1 tsp salt (pink Himalayan or sea salt)
Wet ingredients:
- 6 large egg whites
- 2 large eggs
- 3/4 cup low-fat buttermilk (180 g/ 6.5 oz) - full-fat would make them too heavy and they may not rise
- 1/4 cup white wine vinegar or apple cider vinegar (60 ml/ 2 fl oz)
- 1 cup lukewarm water (240 ml / 8 fl oz)
Tips:
Instructions
- I love sourdough bread. In fact, it was what I missed most when I gave up grains and sugar, and started following a healthy keto & paleo diet. Making good sourdough bread has been one of the biggest challenges I've faced when adapting traditional all-time favourites so they can be eaten on a ketogenic diet. It took some fine-tuning but I finally got the recipe I wanted.This bread is not the first sourdough recipe I've created - there is a similar recipe in the KetoDiet app and also in my upcoming cookbook. Both use sightly different ingredients and a different cooking technique. Unlike the traditional sourdough bread, this one doesn't require several days of culturing - it takes just over an hour. To recreate the typical taste of a sourdough bread, I used vinegar and buttermilk. Also, because I used vinegar, I omitted cream of tartar which I use in most of my baked recipes. As I mentioned before, vinegar is a good alternative to cream of tartar when making gluten-free baking powder.Compared to my other keto bread recipes, I used slightly different temperature and cooking time because these baguettes seemed to be more prone to burning - maybe due to the buttermilk.
Tips & Similar Recipes:
- For more tips on how to make the perfect low-carb loaf, have a look at this post(troubleshooting at the end of the post).
- This dough is based on the these Keto Buns(without the garlic powder, onion powder, sesame seeds and cream of tartar)
- Nut-free keto buns - include flaxmeal and coconut flour.
- Psyllium-free buns - include flaxmeal, almond flour and coconut flour.
- Flax-free, multi-purpose bread, includes coconut flour and a nut-free option.
- If you don't want to use coconut flour:Although I haven't tried it, I'd use twice the amount of almond flour or flaxmeal instead of coconut flour (1 cup of almond flour / flaxmeal instead of 1/2 cup coconut flour). Or you can use the same amount but reduce the water by ~ 1/2 cup.
Hands-on
10-15 minutesOverall
60-75 minutesNutritional values (per 1 regular baguette)
Total Carbs14.1gramsFiber9.6gramsNet Carbs4.5gramsProtein12.2gramsFat16.4gramsof which Saturated2.7gramsCalories232kcalMagnesium100mg (25%)Potassium359mg (18%)Macronutrient ratio: Calories from carbs (8%), protein (23%), fat (69%)Ingredients (makes 8 regular baguettes or 16 mini baguettes)
Dry ingredients:
- 1 1/2 cup almond flour (150 g / 5.3 oz)
- 1/3 cup psyllium husk powder (40 g / 1.4 oz)
- 1/2 cup coconut flour (60 g / 2.1 oz)
- 1/2 packed cup flax meal (75 g / 2.6 oz)
- 1 tsp baking soda
- 1 tsp salt (pink Himalayan or sea salt)
Wet ingredients:
- 6 large egg whites
- 2 large eggs
- 3/4 cup low-fat buttermilk (180 g/ 6.5 oz) - full-fat would make them too heavy and they may not rise
- 1/4 cup white wine vinegar or apple cider vinegar (60 ml/ 2 fl oz)
- 1 cup lukewarm water (240 ml / 8 fl oz)
Tips:
Lukewarm water in this recipe will slow down the raising effect of baking soda. I tried both boiling water and lukewarm and although it made no difference for baguettes, some people have been experiencing air bubbles / hollow insides when making a loaf. More tips on the perfect loaf are listed here.For a paleo, dairy-free option, try this coconut milk kefir recipe instead of the buttermilk: Use half of the coconut milk kefir and half water.Make sure you use a kitchen scale for measuring all the dry ingredients. Using just cups may not be enough to achieve best results, especially in baked goods. Weights per cups and tablespoons may vary depending on the product/ brand or if you make you own ingredients (like flaxmeal from flaxseeds). Psyllium absorbs lots of water. When baking with psyllium, you must remember to drink enough water throughout the day to prevent constipation!INSTRuctions
- Preheat the oven to 180 °C/ 360 °F (fan assisted). Use a kitchen scale to measure all the ingredients carefully. Mix all the dry ingredients in a bowl (almond flour, coconut flour, ground flaxseed, psyllium powder, baking soda, and salt).Do not use whole psyllium husks - if you cannot find psyllium husk powder, use a blender or coffee grinder and process until fine. If you get already prepared psyllium husk powder, remember to weigh it before adding to the recipe. I used whole psyllium husks which I grinded myself. Do not use just measure cups - different products have different weights per cup!
- In a separate bowl, mix the eggs, egg whites and buttermilk.The reason you shouldn't use only whole eggs is that the bread wouldn't rise with so many egg yolks in. Don't waste them - use them for making Homemade Mayo, Easy Hollandaise Sauce or Lemon Curd. For the same reason, use low-fat (not full-fat) buttermilk.
- Add the egg mixture and process well using a mixer until the dough is thick. Add vinegar and lukewarm water and process until well combined.
- Do not over-process the dough. Using a spoon, make 8 regular or 16 mini baguettes and place them on a baking tray lined with parchment paper or a non-stick mat. They will rise, so make sure to leave some space between them. Optionally, score the baguettes diagonally and make 3-4 cuts.
- Place in the oven and cook for 10 minutes. Then, reduce the temperature to 150 °C/ 300 °F and bake for another 30-45 minutes (small baguettes will take less time to cook).
- Remove from the oven, let the tray cool down and place the baguettes on a rack to cool down to room temperature. Store them at room temperature if you plan to use them in the next couple of days or store in the freezer for up to 3 months.Baked goods that use psyllium always result is slightly moist texture. If needed, cut the baguettes in half and place in a toaster or in the oven before serving.
- Enjoy just like regular baguettes!Tip: To save time, mix all the dry ingredients ahead and store in a zip-lock bag and add a label with the number of servings. When ready to be baked, just add the wet ingredients!
Creator of KetoDietApp.comI changed the way I ate in 2011, when I was diagnosed with Hashimoto’s, an autoimmune disease that affects the thyroid. I had no energy, and I found it more and more difficult to maintain a healthy weight.That’s when I decided to quit sugar, grains, and processed foods, and to start following a whole-foods-based ketogenic approach to food. - Preheat the oven to 180 °C/ 360 °F (fan assisted). Use a kitchen scale to measure all the ingredients carefully. Mix all the dry ingredients in a bowl (almond flour, coconut flour, ground flaxseed, psyllium powder, baking soda, and salt).Do not use whole psyllium husks - if you cannot find psyllium husk powder, use a blender or coffee grinder and process until fine. If you get already prepared psyllium husk powder, remember to weigh it before adding to the recipe. I used whole psyllium husks which I grinded myself. Do not use just measure cups - different products have different weights per cup!
- In a separate bowl, mix the eggs, egg whites and buttermilk.The reason you shouldn't use only whole eggs is that the bread wouldn't rise with so many egg yolks in. Don't waste them - use them for making Homemade Mayo, Easy Hollandaise Sauce or Lemon Curd. For the same reason, use low-fat (not full-fat) buttermilk.
- Add the egg mixture and process well using a mixer until the dough is thick. Add vinegar and lukewarm water and process until well combined.
- Do not over-process the dough. Using a spoon, make 8 regular or 16 mini baguettes and place them on a baking tray lined with parchment paper or a non-stick mat. They will rise, so make sure to leave some space between them. Optionally, score the baguettes diagonally and make 3-4 cuts.
- Place in the oven and cook for 10 minutes. Then, reduce the temperature to 150 °C/ 300 °F and bake for another 30-45 minutes (small baguettes will take less time to cook).
- Remove from the oven, let the tray cool down and place the baguettes on a rack to cool down to room temperature. Store them at room temperature if you plan to use them in the next couple of days or store in the freezer for up to 3 months.Baked goods that use psyllium always result is slightly moist texture. If needed, cut the baguettes in half and place in a toaster or in the oven before serving.
- Enjoy just like regular baguettes!Tip: To save time, mix all the dry ingredients ahead and store in a zip-lock bag and add a label with the number of servings. When ready to be baked, just add the wet ingredients!
INGREDIENTS
| Votes: 502 Rating: 3.64 You: |
- While preheating the oven at 350°F, start combining the dry ingredients in a bowl.
- Boil the cup of water and pour this into the bowl. Mix in the egg whites and vinegar as well. Beat the ingredients together with a hand mixer for around 30 seconds. Avoid overmixing. The outcome should have a Play Doh-like consistency.
- Moisten your hands and shape the dough into 4-8 pieces. You can mold them into hamburger or hot dog buns, depending on your preference. Lay the formed dough on a baking sheet greased with oil.
- Place the sheet on the lower rack of the oven and bake for 50-60 minutes. Time depends on the size of the bread you made. Check if done by tapping the base of the bun. If you hear a hollow sound, remove them from the oven.
- Serve together with some butter or your favorite toppings. Keep them in the fridge or freezer.
Macros (per serving): Calories: 73kcal – Fat: 2.8g – Net carbs: 3g (total carbs: 9.5g, fiber: 6.5g) – Protein: 3.1g
Love this bread recipe? Please share this post! Have any question or feedback about this recipe? Let us know in the comments below!
This recipe is inspired by Maria Emmerich.
Maria Emmerich is a wellness expert in nutrition and exercise physiology. She shares her passion and helps others achieve their health goals. This recipe and many other innovative options are available in her cookbook The Art of Healthy Eating – Savory and Keto Restaurant Favorites as well as The 30-Day Ketogenic Cleanse
- Thewatch will keep a constant lookout for shipping, whales, flotsam (logs,containers etc.) or any object that may endanger the vessel and inform theCaptain or Mate of such sightings.
- Whenin doubt about any situation, regardless of the time of day or night, informthe Captain or Mate.
- The Captain will be informedany time the weather or sea conditions change from within parameters set by theCaptain.
- Every effort will be made tobe courteous to any off-watch crew members that may be sleeping by keeping thevessel as quiet as possible.
- The watch will make an inspection about the deck and rigging at thebeginning of each watch to check that gear, lines and lashings are secure andfree of chafe.
- The watch will make a walkthrough inspection below decks at least once each hour to check for anythreatening conditions such as, fire,fumes, or flooding.
- The watch will remain ondeck as much as possible, particularly at night, coming below only fornecessities.
- All watch standers willremain awake for the duration of their watch.Sleep while on watch endangers yourself and your shipmates. If you are unable to stay awake, notify theCaptain.
- Each watch will maintain the ship's log.
- No one shall make anychanges in the vessel's course, except inan emergency maneuver, without informing the Captain or Mate.
- 1lb./ 16 oz. /3 cups plain flour
- 8g / 1 sachet instant dried yeast
- Pinch of salt
- 45 ml/ 3 tbsp. olive oil
- 30 ml/ 2 tbsp. plain natural yoghurt (preferably whole milk)
- About 260 ml/ 9 fl. oz. / 1⅕ cups water
- For the filling:
- 3 medium sized potato, cooked, skinned and mashed – about 2 ¼ cups -
- 5ml/1 teaspoon Turkish red pepper flakes or 2 tsp. Turkish red pepper paste (optional)
- 200gr/ 7 oz. Turkish white cheese or feta cheese, juice drained and crumbled.
- 28 gr/ 1 oz. / ½ cup chopped flat leaf parsley
- 30 ml/2 tbsp. olive oil
- Salt and ground black pepper to taste
- Nonstick pan or griddle to cook the Gozleme
- Combine about 150 ml / 5 fl. oz. warm water, yeast and salt in a small bowl, stir and cover. Stand in a warm place for 5 minutes or until bubbles form on the surface.
- Sift the flour into a large bowl. Make a well in the middle and pour in the yeast mixture, olive oil, yoghurt and the remaining (about 110 ml/ 4 fl. oz./ ½ cup) water. Using your hand, draw in the flour from the sides and work the mixture into a dough. Knead thoroughly to form a soft dough. Divide the dough into 8 pieces, knead them and roll into balls. Place the balls on a floured surface, cover with a damp cloth and leave them to rest for 30 minutes, or until the dough doubles in size.
- Meanwhile, prepare the filling. Mash the cooked potatoes with a fork or a masher in a large bowl. Drain the juice of the Turkish white cheese or feta cheese and crumble into the bowl. Stir in the chopped parsley, the red pepper paste or red pepper flakes (if you wish) and pour in the olive oil. Season with salt and freshly ground black pepper and combine all well. Your filling is ready.
- On a lightly floured surface, roll out each of the balls of the dough with a rolling pin into thin, flat rounds, about 40cm/16in diameter. Sprinkle a little flour as you roll the dough so that the dough won’t stick. Roll until you achieve a thin sheet of a flat round.
- Fold the left and right sides of the dough in a way for the edges to meet in the middle. Spread about 2 ½ - 3 tablespoons filling into the middle part of this flat sheet. Then fold the top and bottom edges over the filling, making sure all the filling is safely covered. Press edges together well to seal. Repeat the same procedure for the rest of the dough balls.
- Heat a griddle or a non-stick pan, and brush one side of the gozleme with a little olive oil and place on the pan to cook for about 2 -3 minutes, or until golden brown. Brush the uncooked side with a little olive oil and then flip it over. Cook for another 2-3 minutes, until golden brown.
- Brush both cooked sides of gozleme with a little olive oil -this will keep the gozleme moist. Cook the rest of the gozlemes the same way.
- You can either roll the Gozlemes to serve, or you can cut in halves or quarters. Ayran, Turkish yoghurt drink or Turkish tea, cay would go really well next to Gozleme.
Turkish Eggplant Casserole with Tomatoes (Imam Bayildi)
Ingredients
- 2 medium eggplant (or 4 small Italian eggplant), about 1 3/4 pound, thinly sliced 1/4 inch thick lengthwise
- Sea salt
- Olive oil
- 1 small yellow onion, diced
- 2 large garlic cloves, minced
- 1/4 teaspoon red chili flakes
- Dash of cinnamon
- One 14.5 ounce can diced tomatoes
- 2 tablespoons finely chopped fresh parsley, divided
Instructions
- Preheat the oven to 350 degrees F.
- Lightly salt the eggplant slices and allow to stand for 20 minutes. Pat the slices dry and set aside.
- Heat a thin layer of olive oil in a large oven proof (preferably cast iron) skillet. Pan fry the eggplant in batches over medium-high heat until golden brown on both sides, about 2 minutes per side. Add more oil as necessary between batches so the eggplant doesn't burn, but try not to have too heavy a hand - the pan just needs to be greased. Remove the eggplant to a plate.
- Add the onion to the skillet and saute over medium heat until soft, 5 minutes. Add the garlic, chili flakes, 1/2 teaspoon sea salt and cinnamon. Cook for one minute more, until fragrant. Carefully pour in the tomatoes and simmer until thickened slightly, 5 minutes. Remove from the heat and stir in half the parsley.
- If using an ovenproof skillet, remove 3/4 of the sauce to a bowl, leaving a thin layer behind. Otherwise, add 1/4 cup of sauce to the bottom of a 8x8 or comparable casserole dish. Arrange one layer of eggplant evenly in the bottom of the skillet or dish. Slather with a layer of sauce, and repeat with the remaining eggplant and sauce - like you would a lasagna.
- Cover with foil and bake in the oven for 45 minutes, until the eggplant is very soft and the sauce has reduced. Allow to sit for 10 minutes before cutting into it. Garnish with the remaining parsley and serve warm or at room temperature.
Recipe Notes
The Ditch Bag
One of our bigger safety projects this summer has been to build our ditch bag. This is one of those things that we really hope we’ve wasted a bunch of money on. But should we ever need it, we want it to have exactly what we need!
There’s no such thing as a one-size-fits-all ditch bag. Everyone’s is different, depending on where they boat, what the likely rescue scenarios are and the budget. Just because this is what we have does not mean it’s right for you — particularly if you are planning to go offshore.
Learn more about buying and owning a boat, gaining skills, working on your boat, buying stuff for your boat and moving aboard in Prepare to Cruise (free mini-course).
Right now, we’re cruising southern Florida and the Keys and the Bahamas. We’re not planning any multi-day passages or major offshore trips. We don’t have a lift raft; with our present cruising plans, the dinghy is our evacuation vessel. Our dinghy always has two life jackets, an anchor and a solar light aboard, so these are not part of our ditch kit.
We chose the contents of our ditch bag for:
- Communication – notifying other boats and the Coast Guard of our predicament and making sure they can find us.
- Injuries – people are often seriously injured in situations where a boat has to be evacuated. Burns, major bleeding and broken bones are the primary things we’re worried about.
- Keeping ourselves alive – food and water are the big items, along with our daily medications.
- Necessary items – if the boat is lost what would we need immediately?
Below is a simple list of our gear with links to what we bought from wherever we bought it. I plan to write some additional posts on specific pieces of gear and why we chose the model we did. Where I’ve already written about something, I include that link also.
Basic Gear for the Ditch Bag
Let’s start with the bag itself and basic gear:
- Ditch bag. We bought an ACR floating ditch bag. You can also use a waterproof bag, sealed 5-gallon bucket or all sorts of other things.
- Waterproof crank/solar flashlight. Disasters always seem to happen at night and you need to be able to see. Tied onto the bag where it’s easy to find first of anything.
- SOLAS Reflexite reflective tape. I put tape on everything I could, paying particular attention to the “critical” gear. If it should go in the water at night, I want to be able to find it.
- Stainless knife.
- Spare glasses. I’m blind without them.
- Small waterproof binoculars. Helpful to spot potential rescuers or what’s on shore.
- Lock & Lock waterproof containers. Much of the gear needs to be kept as dry as possible — and organized. I got two of these (they fit the old Orion flares and are waterproof vs. the round flare container in the photo above) and already had one of these (for papers). Some of the others that I bought seem to no longer be made/sold, but you can see all the Lock & Lock containers available from Amazon here (Amazon seems to usually have the most sizes). The airspace inside these will also help the bag to float.
- Duct tape — as much as there’s room for (wrap some around a pencil if you need to make a small roll).
- Swim noodle, cut into chunks. The ditch bag says it will float 25 pounds of gear but we want to be sure it will float if we miss getting it into the dinghy. Air in the Lock & Lock boxes will help, but I also took a swim noodle and cut it into chunks to put into every nook and cranny I could.
Communication Gear
Communication is the first key since we are near other boats and the Coast Guard (assuming we can’t make it to shore under our own power, which is also a possibility with the dinghy). We believe that with the following, we would be found within 72 hours (actually, less than that, but for food purposes . . .):
- EPIRB (why we chose this one)
- Handheld VHF
- Phone in waterproof case (read about my waterproof case)
- Solar charger for VHF and phone (and cords!) — it doesn’t do any good to have electronics and no power
- Handheld GPS (and 8 sets of extra batteries) — ours is 10 years old but still works; lithium batteries hold their power in storage. Phone has GPS too for backup but we want to be able to tell rescuers exactly where we are.
- Greatland green laser flare and 4 extra batteries
- Three Pains & Wessex red SOLAS handheld flares (day/night) — from West Marine, do “Ship to Store” for free as hazardous shipping is very expensive
- All the old flares on the boat (red and smoke) — don’t meet USCG requirements since out of date but in an emergency I want all the flares I can get my hands on!
- Gloves to hold flares — slag will drip from burning flares and everyone who has ever fired one off says “have gloves!”
- Cyalume sticks — these are the sticks that night divers use — bend it and it lights up even in water
- Day signal flag — it was on the boat; frankly doubt anyone would see it since it’s less than a yard square
- 2 ACR C-light strobes (use same batteries as GPS) — got a special deal or we wouldn’t have gotten them; we have strobes on our PFDs (Update: if ACR unavailable, consider the See-Me Waterproof LED light)
- Whistles (the kind that work when wet)
- About a month after we packed the ditch bag, the Sirius Signal electronic flares came out (see them on Amazon). We love the idea of not having burning slag and now have one in the bag, too. Since we think it’s impossible to have too many signalling devices, we left the other flares in, too. We carry extra batteries for the Sirius Signal — it comes with 3 “C” batteries and we carry 12 extra.
- We also now have an inReach SE satellite tracker/communicator. We really got it to show where we are online and for the text communication ability, but it would be invaluable in an emergency. On passage, it’ll be hooked onto the ditch bag “just in case.”
First Aid
We figure that a fire, explosion or holing the boat are the most likely reasons we’d have to abandon ship. Consequently, our ditch bag contains what I call our “oh shit!” medical supplies to deal with burns, major bleeding and broken bones, along with a few more everyday items. You may have different needs or feel different products are best. This is one area where you just can’t take everything, so figure out what you are most likely to need that would be life-saving.
- QuikClot (2) – clotting sponge
- Israeli Battle Dressing (1 4″ and 1 6″ size)- very effective pressure bandage
- Telfa pads – 3″ x 4″
- Cohesive elastic bandage – sticks to itself; holds bandages on; doubles as compression bandage for breaks and sprains
- WaterJel – for burns
- Second Skin Burn Pads – for burns – several sizes
- Bacitracin – antibiotic ointment that is particularly good for burns
- SAM splint
- Ace bandage – 3″ (if space is a problem, I’d drop this since we have the cohesive bandages)
- Regular and extra-large Band-Aids (can be held on with the cohesive bandages); butterfly bandages
- Aspirin – few in case of a heart attack
- OTC pain meds
- Stong prescription pain meds
- Prescription muscle relaxant – in case of strained back or broken ribs
- Epi-pen and steroids for anaphalytic allergic reactions
- Mylar emergency blankets (5) — retain heat, provide shade, signalling
Staying Alive
We are coastal cruising and with our communication devices we plan (hope!) that help will arrive within three days. Hence, no fishing gear or watermaking capability.
- Water — four ounces per person per day is considered the absolute minimum. I can’t imagine that in the heat of south Florida at certain times of the year. Instead of the little pouches (expensive!) I bought a package of 12 12-ounce water bottles for just a couple bucks at the grocery!
- Dog water dish — Paz is small so we just use a silicone muffin cup as her travel water bowl. I stuck an extra one in the ditch bag.
- SOS Emergency Food Rations — 1200 calories per person per day, with a tiny bit given to Paz (she eats less than 100 calories a day). 5 year shelf life and food that won’t make you thirsty. Supposedly doesn’t taste too bad.
- Sunscreen — if you’ve just had to abandon the boat, sunscreen isn’t at the top of your list. But in south Florida, you’re going to burn fast!
- Sun hats — not the prettiest, but it’ll keep us more comfortable and help avoid dehydration. Plus you can wet it with salt water and stick it on your head for major cooling action! Got the white (milk) as it’ll be coolest in the sun.
- Daily medications – a 5-day supply and we change it out every month.
Items Needed When We Reach Safety
With luck, our phone (discussed under communications) will be with us and still working. But pretty much everything else we own is on the boat. What will we need in those first few days?
- ID – copies of our passports and drivers licenses
- Health insurance cards (copies) — chances are good that we’ll need medical care in an abandon ship scenario.
- Car keys – since we are coastal cruising and have a car, we’re want to be able to use it to put our lives back together. Easier than calling a locksmith and having a new key made.
- Boat documentation and insurance (copies)
- Credit card copies — some companies will issue an extra card, which is even better
- Cash
Bottom Line
Note that this is emphatically not an offshore ditch bag. We are coastal cruising in an area with good rescue services. This is what we feel will serve us where we are going in the near future. It’s possible that we’re wrong. I hope we never find out if we did it right!
No comments:
Post a Comment